Ravenna from Snow White and the Huntsman
- silwencosplay
- Apr 14
- 5 min read

This might be my favorite thing I have created so far. I don't know if you have seen this movie (it's a bit old at this point), but Ravenna is the evil queen in this retelling of Snow White. Let's be honest, she absolutely steals the show. That and her wardrobe.
There are many outfits I want to create from this movie (looking at you wedding dress), but for now, I chose my favorite: The Crow Dress. All of her dresses have a unique theme to them. This one is often referred to as her crow skull dress. This is her uniform, the dress that truly defines her character. It's structured and binding, but still flows like a shadow. It's hard like iron, but soft. It's beauty is marred by the reminder of death and rot. And I LOVE it.
So, when I was first asked to be a guest at Animate Raleigh, I knew I wanted to make something new to wear. I was looking at something simple, but my husband convinced me to try for this one. I thought it would be impossible to pull off in the two and a half months I had. And while I was partially right, I was able to have it complete enough for the convention. I only changed a couple of things later when I competed at MomoCon. What is featured in the first photo is before the changes I made.
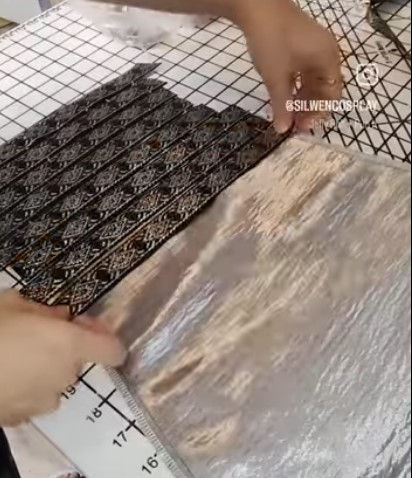
Let's start with the underlayer. Originally, I had decided to make a full, silver under dress. I wound up choosing a silver fabric with some texture to more closely match the movie. That is what is pictured above. This fabric was awful. It snagged if you so much as looked at it. Later, I remade this with my own pattern and a stiffer bridal satin before I competed at MomoCon. That change was definitely the right one.
The base silver layer is unlined, but I did bias bind the seams. I chose this route as I was worried about overheating. It gives a nice, clean finish to an unlined garment. The remake was a simple silver skirt, pleated on the sides and back to five some fullness. I cut the hem on the mannequin into a longer train.
The silver top is simple, off the shoulder, and serves as the basis for the details to sit
on. I took two black feather boas and stitched them around the top. This is embellished with black fabric buttons and silver filigree plates (all from Amazon).

The crow skulls are 3D printed from a file on Etsy, though I did break them apart and reshape them after printing. They are primed with Rust-Oleum 2-in-1 Primer Filler and the base color is a chalk spray paint by Rust-Oleum. I finished by hand painting brown for shadows and white for highlights. They are simply glued into place with black Surebonder.
The sleeves are made from the same silver satin as the base, with 15 yards of ribbon stitched on top. I made sure to stagger the pattern to give a better visual effect. I also added buttons all the way up the sleeves at the seam. The sleeves open at the bottom with some elastic.
The sleeve poofs I drew out a pattern I thought would work and cut it out
of black voile that I happened to have on hand. I gathered the top and bottom and stitched it to the silver sleeve. I bias bound the edges and added some pearl details. The swoops that hang off of the poofs were drafted by draping them, cut from voile, bias bound, and bedazzeled with black stones around the edge of the bias tape. Super simple.
The black skirt was made from two layers of voile, gathered down at the waist and secured in the waist band. This simply ties around my waist. The hem was cut into more of an oval shape while draped on my dress form. The edges were also bias bound for protection and finishing.

The corset is where this build really shines. I used a pattern for 18th century stays that I modified for this design. There's 114 individual boning channels covering every inch of this corset. I used zip ties as they are similar to reed boning that would have been used with this style of corset. The edges are bias bound and I added a little lace detail to the bottom tabs and on the inside of the corset.
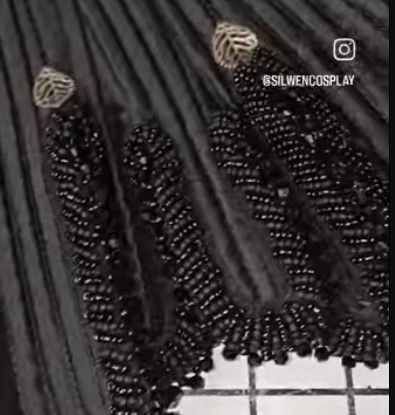
I then spent three weeks hand beading the bottom with three different kinds of beads. That took so long, but it was well worth the effort.
And then there's the front plate. This plate is made from dozens of small 'noodles' of Worbla that I rolled out by hand (like Play-Doh) and intertwined with each other until I was happy with the shape. I primed them with Rust-Oluem 2-in-1 Primer and Filler. This is an automotive primer that is used to fill in scratches on a car before painting. I love this stuff. I like to layer it on heavy and wet sand it to a glass shine. It takes a lot of the work out of smoothing down Worbla and 3d prints.
Once I was happy with the texture, I used Rust-Oleum Metallic Silver spray paint to give it that metal shine. I did not spay a top coat protector onto this as it would dull the shine. That does mean the silver wears off in places over time, but this is simply hand stitched to the corset and easy to remove for touch ups.
The center of the corset has a beaded trim, the same that I used on the top of the dress, and more crow skulls glued to the front.
And, of course, we cannot forget her crown. This is actualy two pieces, a crown and a tiara. The crown I designed in Blender and 3D printed. I primed again with Rust-Oleum 2-in-1 Prime and Filler before using a gun metal silver spray paint to get that dark iron color. I lightly spritzed the top of the point with the same silver paint I used on the front panel.
To make the drips, I used Surebonder glue and allowed that to drip down as it dried. I gold leafed this to get the melted gold effect. This is not accurate to the movie, just a little touch I added as a nod to her fate in the second film.
I also made some decorative braids from matching wig hair and glued those to the crown. This is easier than styling them into the base wig. I used a soldering iron to melt holes into the inside of the grown and glued in some metal rings. I use these to secure the crown to the wig with bobby pins.
The tiara is made from Worbla and scultpted to resemble bird bones. This was also primed and paintd with the same paints mentioned above. I cut several silver chains to size and glued those to the inside of the tiara. There are combs on the sides to secure this to the wig.
And that's pretty much it! This is such a comfortable build and one of the first things I made that I felt truly showed my skillset. There's a certain look I can't quite describe that I see from master level cosplayers and this one I feel fits that look.
After my final modifications, I competed at MomoCon 2025 in the Needlework category. It won Best Master!

Comments